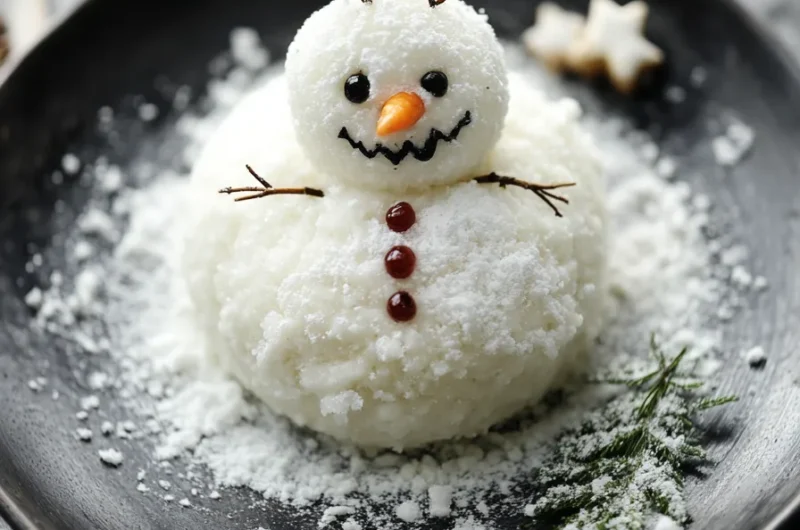
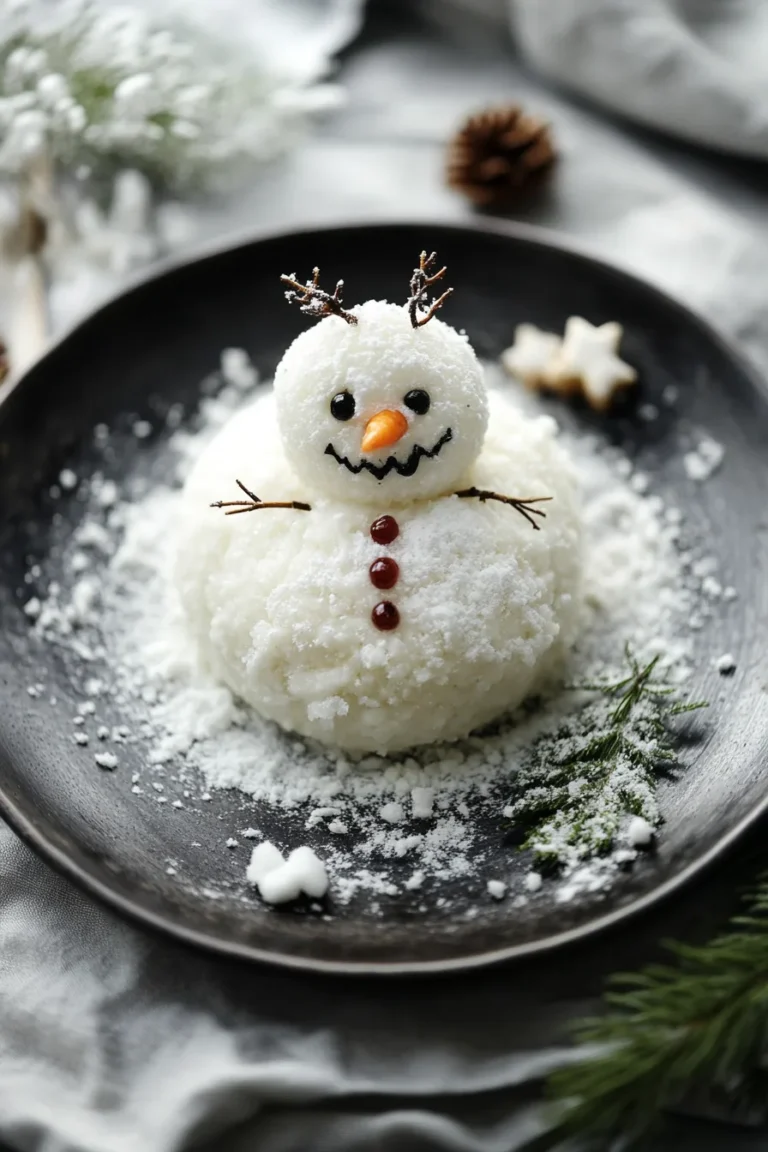
Snowman Cheese Ball is an amazing way to bring festive cheer to your holiday gatherings. This delightful appetizer combines the richness of cheese with creative artistry to form a fun snowman shape that will wow your family and friends. With various flavors and textures, this edible decoration serves as both a conversation starter and a delicious nibble.
Imagine this: the smiling snowman crafted from creamy cheese sits proudly on your serving table, festively adorned with colorful peppers, olives, and crackers. Not only does it look adorable, but it also brings a burst of flavor that complements any holiday spread. In this guide, you will discover the appealing elements of this recipe, how to prepare it, and tips for serving it perfectly.
Creating a Snowman Cheese Ball isn’t just about aesthetics; it’s also about the joy of sharing delightful food with loved ones. Whether you’re hosting a holiday party, attending a potluck, or simply indulging in festive treats with your family, this recipe will surely impress your guests. Let’s dive deeper into why this fun and festive dish deserves a prominent place at your holiday table!
Why You’ll Love This Recipe
Snowman Cheese Ball is not just a delightful treat; it’s an incredible addition to any holiday gathering. Here’s why you’ll be excited to make this recipe:
1. Visual Appeal – The snowman shape will attract attention and evoke festive joy.
2. Versatile Ingredients – You can customize flavors to suit different tastes, from savory to spicy.
3. Easy to Prepare – With straightforward instructions, this cheese ball can be assembled in no time.
4. Great for Sharing – Perfect for parties, this dish promotes socializing over food, bringing people together.
5. Showstopper – The whimsical design makes it a fantastic centerpiece for any holiday table.
6. Kid-Friendly – Children will love this fun way to enjoy cream cheese, helping motivate picky eaters to snack.
With these features in mind, it’s clear that the Snowman Cheese Ball is not only a delicious option but also a wonderful way to deliver joy during the festive season!
Preparation and Cooking Time
Preparing the Snowman Cheese Ball takes approximately 30 minutes of active time, plus chilling time. Here’s a quick breakdown:
– Preparation Time: 20 minutes
– Chilling Time: 2-4 hours (or overnight for best results)
– Total Time: Around 2 hours and 30 minutes
This timeline makes it easy to fit into your holiday schedule, allowing you to prepare other dishes while it chills.
Ingredients
– 2 (8 oz) packages of cream cheese, softened
– 1 cup shredded cheddar cheese
– 1 cup shredded mozzarella cheese
– 1/2 cup diced bell peppers (orange and red)
– 1/4 cup finely chopped green onions
– 1/4 teaspoon garlic powder
– 1/4 teaspoon onion powder
– Salt and pepper, to taste
– Black olives, for eyes and buttons
– Pretzel sticks, for arms
– Snack crackers or vegetable sticks, for serving
Step-by-Step Instructions
Creating your Snowman Cheese Ball is straightforward if you follow these simple steps:
1. Combine Cheese Mixtures: In a large bowl, mix the softened cream cheese, cheddar cheese, and mozzarella cheese until well blended.
2. Add Seasonings: Stir in the diced bell peppers, chopped onions, garlic powder, onion powder, and season with salt and pepper to taste.
3. Shape the Snowman: Divide the cheese mixture into three portions—one large for the bottom, one medium for the middle, and one small for the head.
4. Form the Ball Shapes: Roll each portion into a ball shape, ensuring they are smooth and uniform. Place the large ball on a serving platter.
5. Stack the Balls: Gently place the medium-sized ball on top of the larger one, followed by the small ball on top to create the snowman shape.
6. Chill the Cheese Ball: Wrap the assembled snowman in plastic wrap and refrigerate for at least 2 hours or overnight for best results.
7. Package for Decoration: Once chilled, remove the wrap and use the diced bell peppers to create a scarf around the snowman’s neck.
8. Add Facial Features: Use the black olives to create eyes and buttons. Place them strategically on the snowman’s head and body.
9. Create Arms: Insert pretzel sticks into the sides of the middle ball to make arms.
10. Serve: Arrange the cheese ball with a variety of crackers or vegetable sticks around it for guests to enjoy.
These steps will help guide you through the fun and easy process of making a delightful Snowman Cheese Ball for your holiday festivities!
How to Serve
To make your Snowman Cheese Ball a memorable centerpiece, consider the following serving suggestions:
1. Presentation Matters: Place the snowman cheese ball on a festive platter or serving board. Decorate the surrounding area with fresh herbs or edible flowers for an elegant touch.
2. Accompaniments: Provide a variety of snacks for dipping. Crackers, pita chips, and assorted vegetables like celery and carrots pair wonderfully with the cheese.
3. Portion Control: Offer plates or napkins for guests to easily take their share without disturbing the snowman design.
4. Flavor Variations: Encourage guests to mix and match with different dip options, such as salsa, hummus, or even a spicy ranch dressing.
5. Themed Drinks: Pair the cheese ball with holiday-themed drinks. Sparkling cider or a festive punch will enhance the joyous atmosphere.
6. Assembly Style: Let guests build their creations by offering a “snowman building” station where they can take a cheese ball base and add toppings as they like.
By putting a little thought into presentation and serving style, you will elevate the experience of your Snowman Cheese Ball and make it a highlight of your holiday celebration.
Additional Tips
– Use Room Temperature Ingredients: Let the cream cheese and other dairy products come to room temperature before mixing. This ensures a smoother texture and better incorporation.
– Experiment with Flavors: Feel free to add herbs, spices, or different cheeses to customize the taste. For a smoky flavor, mix in some smoked gouda.
– Prepare in Advance: Making the Snowman Cheese Ball a day ahead of your event can enhance the flavors as they meld while chilling overnight.
– Ensure Proper Chilling: Chilling the cheese ball is crucial. It helps maintain its shape and makes it easier to handle while decorating.
Recipe Variation
Switching up the recipe can bring new life to your Snowman Cheese Ball! Here are some fun variations:
1. Savory Herb Cheese Ball: Add chopped fresh herbs like dill, parsley, or chives for a fresh, savory twist on the original recipe.
2. Spicy Snowman: Incorporate some diced jalapeños or a splash of hot sauce into the cheese mixture for a zesty kick.
3. Sweet and Savory: Blend in some dried cranberries or finely chopped apples to create a sweet-savory combination that brightens the flavor profile.
Freezing and Storage
– Storage: Keep your Snowman Cheese Ball covered in the refrigerator for up to a week. Make sure it’s well-wrapped to prevent it from absorbing any unwanted odors.
– Freezing: You can freeze the cheese ball for up to 2 months. Allow it to fully thaw in the fridge before serving to maintain the texture and flavor.
Special Equipment
To create the perfect Snowman Cheese Ball, consider having these tools handy:
– Mixing bowls: For combining your cheese and seasonings smoothly.
– Plastic wrap: Essential for covering the cheese ball as it chills.
– Serving platter: A decorative dish or board to present your festive creation.
– Sharp knife: For cutting vegetables and creating the perfect details on the snowman.
Frequently Asked Questions
Can I use other kinds of cheese?
Yes, you can substitute other cheese varieties based on your preference. Cream cheese is essential for texture, but you can mix in your favorites.
How do I avoid a mess while shaping?
Lightly wet your hands with water before shaping the snowman. This will prevent the cheese mixture from sticking to your hands.
Can I use store-bought cheese spreads?
Store-bought cheese spreads can save time, but they may not provide the same creamy texture as freshly mixed versions.
What if I don’t have pretzel sticks?
If pretzel sticks are unavailable, you can use toothpicks or even smaller crackers as a substitute for the snowman’s arms.
Is this cheese ball gluten-free?
The Snowman Cheese Ball itself is gluten-free, but be sure to offer gluten-free crackers or vegetable sticks for serving.
Conclusion
In summary, the Snowman Cheese Ball is a delightful and creative recipe that adds festive fun to any holiday gathering. With its visual appeal, customizable flavors, and ease of preparation, it’s an excellent choice for entertaining. Not only does it serve as an eye-catching centerpiece, but it also offers delicious taste and texture, making it a beloved treat among guests of all ages. With a little creativity and some thoughtful presentation, your Snowman Cheese Ball will be the highlight of the holiday feast!
Snowman Cheese Ball: An Incredible Ultimate Recipe for the Holidays
- Total Time: 15 minutes
Ingredients
– 2 (8 oz) packages of cream cheese, softened
– 1 cup shredded cheddar cheese
– 1 cup shredded mozzarella cheese
– 1/2 cup diced bell peppers (orange and red)
– 1/4 cup finely chopped green onions
– 1/4 teaspoon garlic powder
– 1/4 teaspoon onion powder
– Salt and pepper, to taste
– Black olives, for eyes and buttons
– Pretzel sticks, for arms
– Snack crackers or vegetable sticks, for serving
Instructions
Creating your Snowman Cheese Ball is straightforward if you follow these simple steps:
1. Combine Cheese Mixtures: In a large bowl, mix the softened cream cheese, cheddar cheese, and mozzarella cheese until well blended.
2. Add Seasonings: Stir in the diced bell peppers, chopped onions, garlic powder, onion powder, and season with salt and pepper to taste.
3. Shape the Snowman: Divide the cheese mixture into three portions—one large for the bottom, one medium for the middle, and one small for the head.
4. Form the Ball Shapes: Roll each portion into a ball shape, ensuring they are smooth and uniform. Place the large ball on a serving platter.
5. Stack the Balls: Gently place the medium-sized ball on top of the larger one, followed by the small ball on top to create the snowman shape.
6. Chill the Cheese Ball: Wrap the assembled snowman in plastic wrap and refrigerate for at least 2 hours or overnight for best results.
7. Package for Decoration: Once chilled, remove the wrap and use the diced bell peppers to create a scarf around the snowman’s neck.
8. Add Facial Features: Use the black olives to create eyes and buttons. Place them strategically on the snowman’s head and body.
9. Create Arms: Insert pretzel sticks into the sides of the middle ball to make arms.
10. Serve: Arrange the cheese ball with a variety of crackers or vegetable sticks around it for guests to enjoy.
These steps will help guide you through the fun and easy process of making a delightful Snowman Cheese Ball for your holiday festivities!
- Prep Time: 15 minutes
- Cook Time: 0 minutes
Nutrition
- Serving Size: 12 servings
- Calories: 150 kcal
- Fat: 12g
- Protein: 5g